
Most complaints about Premiere Pro's timeline come down to using the scroll wheel for a job it cannot do. A wheel reports a number of clicks. It has no idea where the next cut is, so it cannot land on one. Almost everything that feels imprecise about timeline navigation improves once the wheel stops being the primary tool.
There are three separate things worth fixing, and they are independent of each other. What the wheel does is a preference. Where the playhead goes is a keyboard question. How far one wheel click zooms is usually a mouse question rather than a Premiere one.
Premiere's defaults change between releases and can be remapped by anyone who has touched the machine before you, so treat every shortcut here as a stock default rather than a guarantee. Edit, then Keyboard Shortcuts, is the only authority on what your copy does. It has a search box, so looking a command up takes a few seconds.
Decide what the scroll wheel is for
Premiere has a preference that most editors never open. Under Preferences, then Timeline, there is a setting for timeline mouse scrolling with a horizontal and a vertical option. It changes what a plain wheel scroll does when the pointer is over the timeline.
Vertical moves you up and down through the track stack, which matters on a sequence with fifteen layers and barely registers on a sequence with three. Horizontal moves you along the sequence in time, which is what most people are reaching for when they scroll.
Whichever you pick, holding Shift while scrolling gives you the other axis, so you keep both. The point of choosing is to make the unmodified gesture the one you use most often, because that is the one your hand does without thinking.
Holding Alt on Windows or Option on macOS while scrolling zooms the timeline horizontally instead of moving through it. This is worth knowing mainly so you can recognise it when you trigger it by accident, which is a common cause of the sudden and apparently random zoom people report.
Move the playhead with the keyboard, because it is exact
This is the change that makes the biggest difference, and it costs nothing. The wheel is a rough positioning device. The keyboard is an exact one, and edit decisions are exact by nature.
On a stock install, the following moves cover almost everything:
| Key | What it does | Use it for |
|---|---|---|
| Left and Right arrow | One frame back or forward | Final trim decisions |
| Shift and arrow | Five frames back or forward | Closing in on a moment |
| Up and Down arrow | Previous or next edit point on targeted tracks | Working cut to cut |
| Home and End | Start or end of the sequence | Getting your bearings |
| Equals and minus | Zoom the timeline in or out | Changing scale deliberately |
| Backslash | Zoom to fit the whole sequence | Resetting after zooming too far |
The up and down arrows are the ones worth building a habit around. When you scroll toward a cut, you are estimating where it is and then correcting. When you press the down arrow, the playhead lands on the cut, because Premiere already knows where the cut is. There is no estimating step to get wrong.
A scroll wheel can only tell Premiere how far to move. The arrow keys can tell it where to go.
Backslash deserves a mention on its own. Getting lost after zooming too far is the single most common way people end up wrestling with the timeline, and one keystroke undoes it. Editors who know this shortcut zoom in freely, because getting back out is free.
Type the distance when you know it
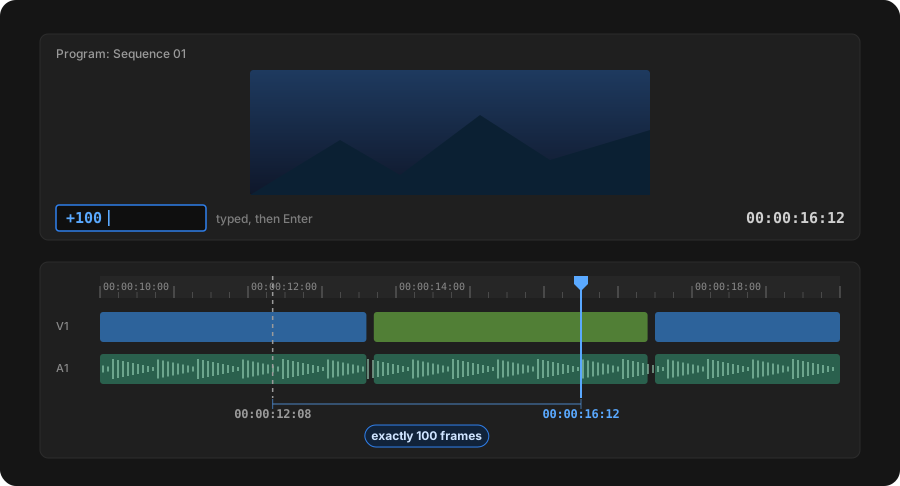
Click the timecode field at the top left of the Program monitor and you can type into it. An absolute timecode jumps the playhead there. A signed number moves it relative to where it is now, so entering plus one hundred moves forward one hundred frames and minus fifty moves back fifty.
This sounds fussy until the situation calls for it. Nudging a clip a known amount, matching a music beat you have already counted, or moving a consistent offset across several edits are all faster typed than scrolled, and they are exact rather than approximate.
Match the zoom level to the phase of the edit
A lot of navigation pain is really a zoom problem. Working at the wrong scale forces constant movement, and then the movement feels like the thing that is broken.
The rough rule is to zoom out far enough that the section you are working on fits on screen, and no further in than the decision requires.
| Phase | Useful scale | Why |
|---|---|---|
| Assembly | Whole sequence visible | You are judging order and length, not frames |
| Rough cut | The scene you are in, fitting the window | You need context on both sides of each cut |
| Fine trim | A few seconds across the window | Individual frames become clickable |
| Audio detail | Under a second | Waveform transients become visible |
| Review | Whole sequence visible | You are watching, not editing |
The bar underneath the timeline is a zoom control as well as a scrollbar. Drag its rounded ends and the visible range changes, which gives you a scale and a position in a single gesture. It is often quicker than zooming and then scrolling to find your place again.
One more preference is worth a look while you are in there. Timeline playback auto scrolling controls how the view follows the playhead during playback, with page scroll, smooth scroll and no scroll as the options. Smooth scroll keeps the playhead centred and is easier to read on long sequences. Page scroll jumps a screen at a time, which some people find disorienting and others prefer.
When the mouse is the actual problem
There is one timeline complaint that no amount of preference tuning fixes, and it is worth separating from the rest. If a single, small movement of the wheel takes the timeline from a normal view to a single frame, the wheel is sending far more scroll events than a notched wheel would.
Free spinning and high resolution wheels, the kind found on most modern productivity mice, report movement in much finer increments. Premiere applies a zoom step per event, so a wheel that reports twenty events where an older mouse reported three will zoom roughly twenty steps. Nothing is malfunctioning at either end. The two designs simply do not agree on what one click means.
The fix is to limit the scroll resolution for Premiere specifically, rather than globally, so that browsing the web stays fast. We wrote that up separately, with a thirty second test to confirm it is your mouse before you change anything: Premiere Pro timeline zooms all the way in when you scroll.
Open any other application with a zoomable canvas and scroll with the same modifier. If it also jumps much further than one step, the wheel is producing the extra events and Premiere is only obeying them. If Premiere is the only application that overshoots, the setting is in Premiere.
Rebind the handful of commands you actually use
Edit, then Keyboard Shortcuts, opens a searchable list of every command with its current binding. Two things make it worth ten minutes even if you like the defaults.
It shows you conflicts before you create them, so you will not discover in three weeks that you overwrote something you needed. And it lets you confirm what your version actually does, which is more reliable than any article, including this one.
If you only change one thing, consider giving zoom to fit a key your left hand can reach without looking. It is the command that makes aggressive zooming safe, and safe zooming is what stops the wheel feeling dangerous.
- Preferences, then Timeline, sets whether the wheel scrolls the timeline sideways or up and down. Shift gives you the other axis.
- The up and down arrows jump to the previous and next edit point, landing exactly on the cut.
- Typing an offset into the timecode field is the fastest way to move a known distance.
- If one wheel click zooms to a single frame, that is a high resolution mouse wheel, not Premiere.
- Open the Keyboard Shortcuts editor to see what your version actually does. Defaults move between releases.
If the wheel itself is overshooting
Premiere Pro Scroll Amplifier lets you set how much timeline movement one scroll click produces, for Premiere on its own, without touching your system wide mouse settings. Free, and it runs in your browser.
Open Premiere Pro Scroll AmplifierFrequently asked questions
Why does my timeline scroll vertically instead of sideways?
Because the timeline mouse scrolling preference is set to vertical. Change it under Preferences, then Timeline. Holding Shift while you scroll always gives you the axis you did not choose.
How do I move the playhead an exact number of frames?
Arrow keys for small moves, one frame each and five with Shift held. For anything larger, click the timecode field and type a signed offset such as plus two hundred.
How do I jump straight to the next cut?
The down arrow moves to the next edit point on the targeted tracks and the up arrow to the previous one. Track targeting decides which cuts count, so if the jumps land somewhere unexpected, check which tracks are targeted.
Why does one scroll click zoom all the way in?
Almost always a high resolution or free spinning mouse wheel sending many events per turn. Limit the scroll resolution for Premiere specifically and the behaviour returns to normal.
Do these shortcuts work the same on macOS?
The arrow key and timecode behaviour matches. Where Windows uses Alt and Ctrl, macOS generally uses Option and Command. Check the Keyboard Shortcuts editor rather than assuming a one to one mapping.
Is there a way back after zooming too far?
Backslash zooms to fit the sequence on a stock install. Worth learning early, because it turns getting lost from a problem into a keystroke.
What to change first
Set the scroll direction to the one you reach for most, then spend a day forcing yourself to use the up and down arrows instead of hunting for cuts with the wheel. Those two changes cover the majority of what feels wrong about the Premiere timeline, and neither requires installing anything.
If the wheel still overshoots wildly after that, the problem is downstream of Premiere and belongs to your mouse. That one has a different fix, and it is worth confirming before you go looking through preferences that were never the cause.